Find the Chord with Storybook
📘 14 min read
On this page...
The project referenced in this post is publicly available at: https://findthechord.netlify.app/
The infamous one-liner product requirement that contains hundreds of technical decisions and a mountain of nuance beneath it… that’s how this project started. And frankly, that’s how it should end as well because good design and engineering arrive at seemingly simple solutions even if the road to get there was at times complicated or uncertain. If complication is necessary, (and it almost always is), it should be hidden behind experiences that are casually described in a single sentence.
Chord names, or what I’ll refer to simply as “chords,” are musical symbols that represent a collection of notes. Chords are spelled with letters, numbers, slashes, and accidentals (♯ and ♭).
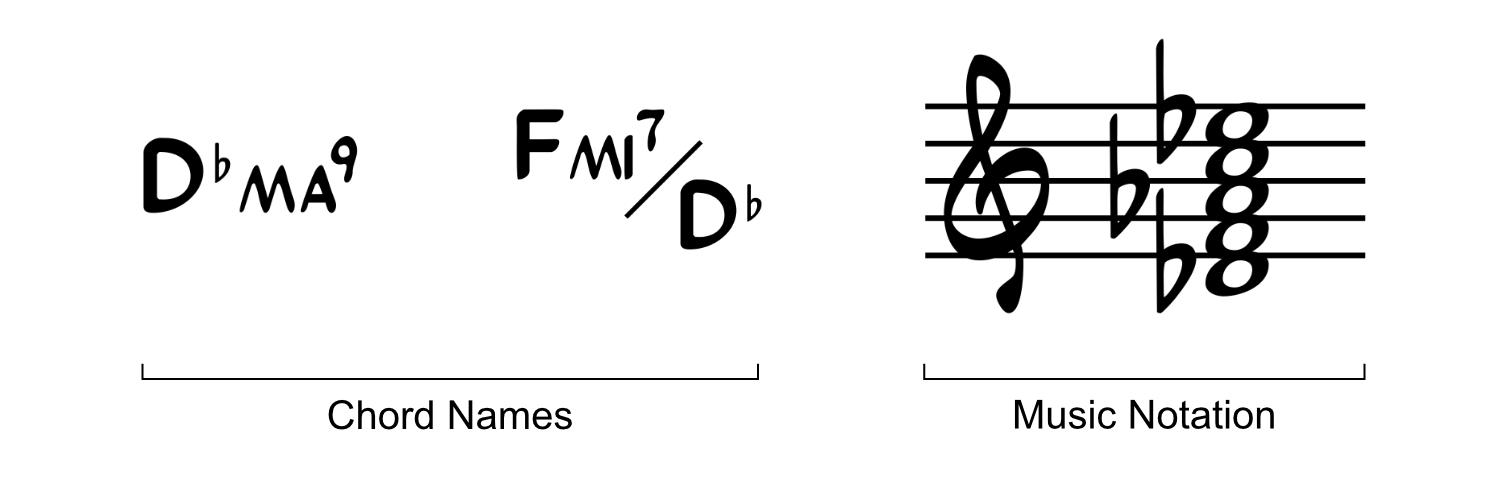
Chords help musicians understand and play music beyond the individual notes that are written. In fact, many musicians can’t read music notation at all but can understand and play chords. Chords are musical guides and very useful to have but, in lots of music, the chords are missing! 👀🤷♀️😢 I put this project together to take music* as an input and reveal chords as the output. In essence, with this project, you can find the chords of any piece of music in the popular digital MIDI format! 😍🥰🥳
*I use the term “music” loosely here as in this case it means MIDI which arguably isn’t music at all. See the discussion below on converting non-musical MIDI data into strictly musical output.
Before we get into the interesting technical weeds, I’d like to set some boundaries and focus this post on the project approach more than the implementation details. I have a lot of experience developing component systems so I tend to think in component terms already. But admittedly, I hadn’t given Component Driven Development (CDD) the full attention and study it deserves. So buckle your seat belt as we explore this (fairly new) development approach!
Tom Coleman of Chromatic (the makers of Storybook) coined the term back in 2017 and 6 years later Chromatic is pushing a beautiful new website dedicated to the cause: www.componentdriven.org.
I’ll let you go through all the wonderful content on that site but this quote asserts their definition of the methodology:
“The development and design practice of building user interfaces with modular components. UIs are built from the ‘bottom up’ starting with basic components then progressively combined to assemble screens.”
I think this is mostly right, but that’s being generous with the term “design.” There are times when bottom-up design makes sense, but this is the exception to the rule. Bottom-up, as described by Chromatic, means starting with the most basic elements and progressively building more complex elements and screens. This design strategy yields the most value when building component libraries—a very useful design space but also very narrow.
For example, it makes a lot of sense to start designing a small component in isolation when your purpose is to contribute said component to a library of “here-are-all-the-components-we-made-that-we-hope-you-find-useful.” But 95% of design challenges are about specific user experiences, not building libraries. In those cases you never start with components in isolation—you start with research and iterate on conceptual experiences until you arrive at appropriate solutions that help users get jobs done. That process requires significant back-and-forth, exploration, and shaping from all sides with the continual north star being the user’s experience, not components.
So, I disagree with Chromatic when they say “design practice of building user interfaces”…
CDD is a bad choice for designing user interfaces but an optimal choice for designing libraries that support user interfaces.
For CDD to be adopted in most projects it should be viewed as an Engineering practice rather than a Design practice. I’ve already mentioned the exception but, don’t incorrectly jump on the CDD bandwagon by focusing your UI designs on components! Keep the focus on users where it belongs! 👩🧓🏽👱🏿👩🏻🦱
Because of this, to practice CDD you need one of two things to be in place:
- a component library you are contributing to or authoring, OR
- an existing product design that can be broken down into components
Using components as building blocks is nothing new, but building web applications from the bottom up is. A more common practice is to build pages and layouts first and slowly fill in the blanks with components. The page-first approach is very natural and can be compared to starting with a blank canvas, drawing rough sketches to create form, blocking in with basic color, and then finally getting down to detail work.
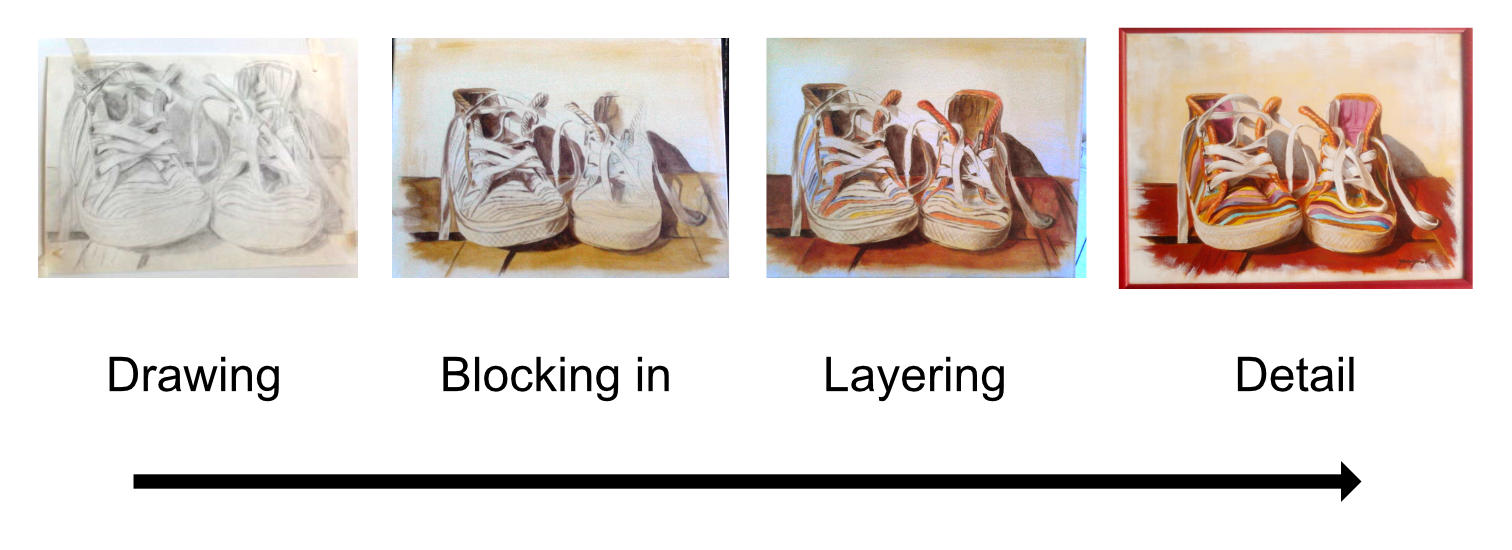
Images credit: tonipopovart.com
Not exactly a perfect analogy but it illustrates how natural it is to start with the big picture first. CDD flips the paradigm on its head and asks you to paint the laces, soles, fabric, and hardwood floors independently of each other and assemble them like a collage in the final product.
This would be difficult with real paint but makes perfect sense in a digital world where all the art is “componentized” into libraries. This modular approach has become the de facto standard in digital art. “Components” in the digital art world are referred to as “assets” and start from the bottom up including small things like brushes, symbols, and decals to medium things like characters, furniture, and vehicles all the way up to massive things like landscapes, cities, and entire worlds.
Digital art was leading the CDD charge under a different name long before Storybook flipped the script for UI engineering. All the more reason to trust the component-driven approach when building products…
As mentioned before, in CDD you will either be building components for a library or you’ll be building components extracted from a (hopefully) well-researched product design. This project, Find the Chord, is a product so I am doing the latter. For design, I turned to the digital music domain and looked to existing patterns before creating new ones. Fortunately, there are solid design patterns to choose from that have been well-researched and tested. Digital Audio Workstations (DAWs) have solved many design challenges for working with MIDI and I used them as inspiration. Let’s examine some of the components I identified:

Finally, before you can begin any CDD project, you need to choose the tech stack. It doesn’t matter what that tech stack is but if it’s web-based it must include Storybook. Storybook is key to a successful CDD project because of how much value it brings, particularly in helping engineers think and build “component-first.” The tech stack I chose is: Storybook, Vite & Vitest, React, and MIDI… and of course everything in Typescript 🤩!
 +
+As is often the case, the first problem you try and solve presents far more nuance than you expect. For me, it was the MIDI clip that displays notes correctly plotted by start time, duration, and pitch.

I began here because I knew performance considerations would require me to render the clip and all its notes as a single SVG image rather than using the DOM to manage them independently. So, I wouldn’t be making a smaller Note component.
I had also considered doing everything in Canvas but decided against it. For an interesting read about why SVG is a sensible default, see https://css-tricks.com/when-to-use-svg-vs-when-to-use-canvas/
One challenge with CDD is dealing with mocked data. To build out this Clip component with confidence I needed real musical data so I could compare my component with the same representation in a DAW. The easiest way to test this is visually… do the notes start at the right time?… do they have the right duration?… the right pitch?… do they match what other accepted programs render? This is easier to test by looking at the picture and the picture is integral to the user experience.
I had to spend a few cycles getting real MIDI data into Storybook before I could continue with the component.
MIDI files are binary which means they need to be translated into a non-binary format that Javascript consumes easily. I had the following data model concerns:
- I need to ingest MIDI which has a specific format of its own
- I need to recognize musical structure: chords, which implies individual note relationships at specific points in time
Since I’m a musician that’s worked with MIDI, I happen to know that MIDI is a communication protocol, not a musical data model. MIDI was designed to get synthesizers talking to each other and to computers and other audio devices. MIDI was not designed to express musical intelligence, comprehension, or understanding. So, when music is represented as MIDI, it’s a series of instructions like “play this note,” “stop that note,” “change the tempo,” all strung together one after the other. A musician can’t make musical sense of these instructions which is bad for me because I’m trying to do something musical! 🎹🎹🎹🎼🎵🎵🎶
Note names and octaves can be derived very easily from MIDI if we assume everything is in the key of C. Each MIDI note has a numeric value that maps directly to a specific note and octave:
| Numeric MIDI value | Note Name + Octave |
|---|---|
| 48 | C2 |
| 89 | F5 |
| 119 | B7 |
| 70 | A♯ or B♭ |
In this case, translation is straightforward except the last line there which has two note names. There are a few ways to deal with this such as storing both names or picking one over the other based on the current key. I decided to store both names so I have the flexibility to pick between them later.
Translating MIDI timing into musical timing is actually very simple conceptually but becomes complicated when you get into the details. MIDI tells us exactly when a note should be played and exactly when it should be stopped—but these come as separate instructions.
| MIDI event | Time since last event (in ticks) | Calculated duration (in ticks) |
|---|---|---|
| NOTE ON 48 | 120 | |
| NOTE ON 89 | 16 | |
| NOTE ON 119 | 39 | |
| NOTE OFF 89 | 433 | 472 |
| NOTE OFF 48 | 26 | 514 |
You can easily derive absolute note durations by measuring the distance between the NOTE ON and NOTE OFF instructions. However, as you dig deeper, there is a whole lot more going on to convert absolute values in MIDI ticks to musical values in “bars and beats”—the necessary construct for me to derive chords.
The MIDI spec is full of terms like “ticks,” “ppqn,” “timebase,” “microseconds,” “SMPTE,” and more… and while I ended up leveraging midi-file to convert from binary to a sensible JS format and tonaljs to help with chord detection, I found nothing suitable to help me with MIDI timing so I had to build that myself. There is enough complication there that I even used comments in the test files to help others understand what was being tested! 😱
describe('updateTimeSignatures()', () => {
  // The following time signatures should each have 1 full measure
  // 1 measure of 5/4: 480 * 5 * 1   = 2400
  // 1 measure of 3/2: 480 * 3 * 2   = 2880
  // 1 meausre of 7/8: 480 * 7 * 0.5 = 1680
  //                                 -------
  //               songDurationTicks = 6960

  const ticksPerBeat = 480
  const ts1 = makeTimeSignature(0, 5, 4)
  const ts2 = makeTimeSignature(0 + 2400, 3, 2)
  const ts3 = makeTimeSignature(0 + 2400 + 2880, 7, 8)
  const songDurationTicks = 6960
  const timeSignatures = [ts1, ts2, ts3]

  test('invalid', () => {
    expect(() =>
      updateTimeSignatures(timeSignatures, 0, ticksPerBeat),
    ).toThrowError()
  })

  test('valid', () => {
    const updated = updateTimeSignatures(
      timeSignatures,
      songDurationTicks,
      ticksPerBeat,
    )

    expect(updated[0]).toMatchObject({
      startTicks: 0,
      durationTicks: 2400,
      startBeat: 0,
      beatsInSignature: ts1.numerator,
    })
    expect(updated[1]).toMatchObject({
      startTicks: 2400,
      durationTicks: 2880,
      startBeat: 5,
      beatsInSignature: ts2.numerator,
    })
    expect(updated[2]).toMatchObject({
      startTicks: 5280,
      durationTicks: 1680,
      startBeat: 8,
      beatsInSignature: ts3.numerator,
    })
  })
})With a basic data model in place, I came back to the Clip component and started iterating to visually match what my DAW was showing.

This part was easy because I could base the SVG viewBox directly on the raw MIDI values:
- height = highest MIDI note number - lowest MIDI note number + 1
- width = total number of MIDI ticks in the clip
With that scale established, I mapped each note’s “pitch,” start time, and duration using the raw MIDI values and everything magically fell into place.
const height = highestNote - lowestNote + 1

<svg
  viewBox={`${startTicks} 0 ${durationTicks} ${height}`}
  preserveAspectRatio="none"
  width="100%"
  height="100%"
>
  {notes.map((note) => {
    return (
      <rect
        key={note.id}
        width={note.durationTicks}
        height="1"
        x={note.startTicks}
        y={highestNote - note.noteNumber}
        className="fill-sky-800"
      />
    )
  })}
</svg>
Even better, by setting the SVG preserveAspectRatio to none, I can now resize this clip in both directions and the notes maintain their proper positions! 😍
This component is also the perfect use case for React’s memoization. The heavy lifting of rendering notes only needs to happen on first render - after that, all size changes on parent components will pull in the memoized version making this very performant. 💯
Below is where the final component ended up.
import { memo } from 'react'
import type { Note } from '../utils/parse'

export type ClipProps = {
  startTicks: number
  durationTicks: number
  notes: Note[]
  lowestNote?: number
  highestNote?: number
  name?: string
  onNoteClick?: (note: Note) => void
}

function Clip({
  notes = [],
  startTicks = 0,
  durationTicks = 0,
  lowestNote = 0,
  highestNote = 127,
  onNoteClick,
}: ClipProps) {
  const height = highestNote - lowestNote + 1

  return (
    <div className="clip flex h-full flex-col rounded border-2 border-sky-100 bg-sky-50">
      <div className="clip-notes flex-grow py-2">
        <svg
          viewBox={`${startTicks} 0 ${durationTicks} ${height}`}
          preserveAspectRatio="none"
          width="100%"
          height="100%"
        >
          {notes.map((note) => {
            return (
              <rect
                key={note.id}
                width={note.durationTicks}
                height="1"
                x={note.startTicks}
                y={highestNote - note.noteNumber}
                style={{
                  fill: `${
                    note.midiChannel === 10
                      ? 'hsla(200, 48%, 29%, 0.3)'
                      : 'hsla(200, 98%, 29%, 1)'
                  }`,
                }}
              />
            )
          })}
        </svg>
      </div>
    </div>
  )
}

export default memo(Clip)The Clip component is only rendering absolute note positions in a box, it tells me nothing about musical timing! The next challenge was to figure out where the bars and beats are and which notes belong to each bar and beat.
I had already taken a stab at this in preparing data for my Clip component. But this is where CDD really shines. As I began work on the TimeSignatureMarkers and BeatMarkers components, I noticed my data was off. Focusing on these components in isolation was extremely helpful and made for solid, robust, and reliable building blocks. It even helped me write better unit tests for the data model.
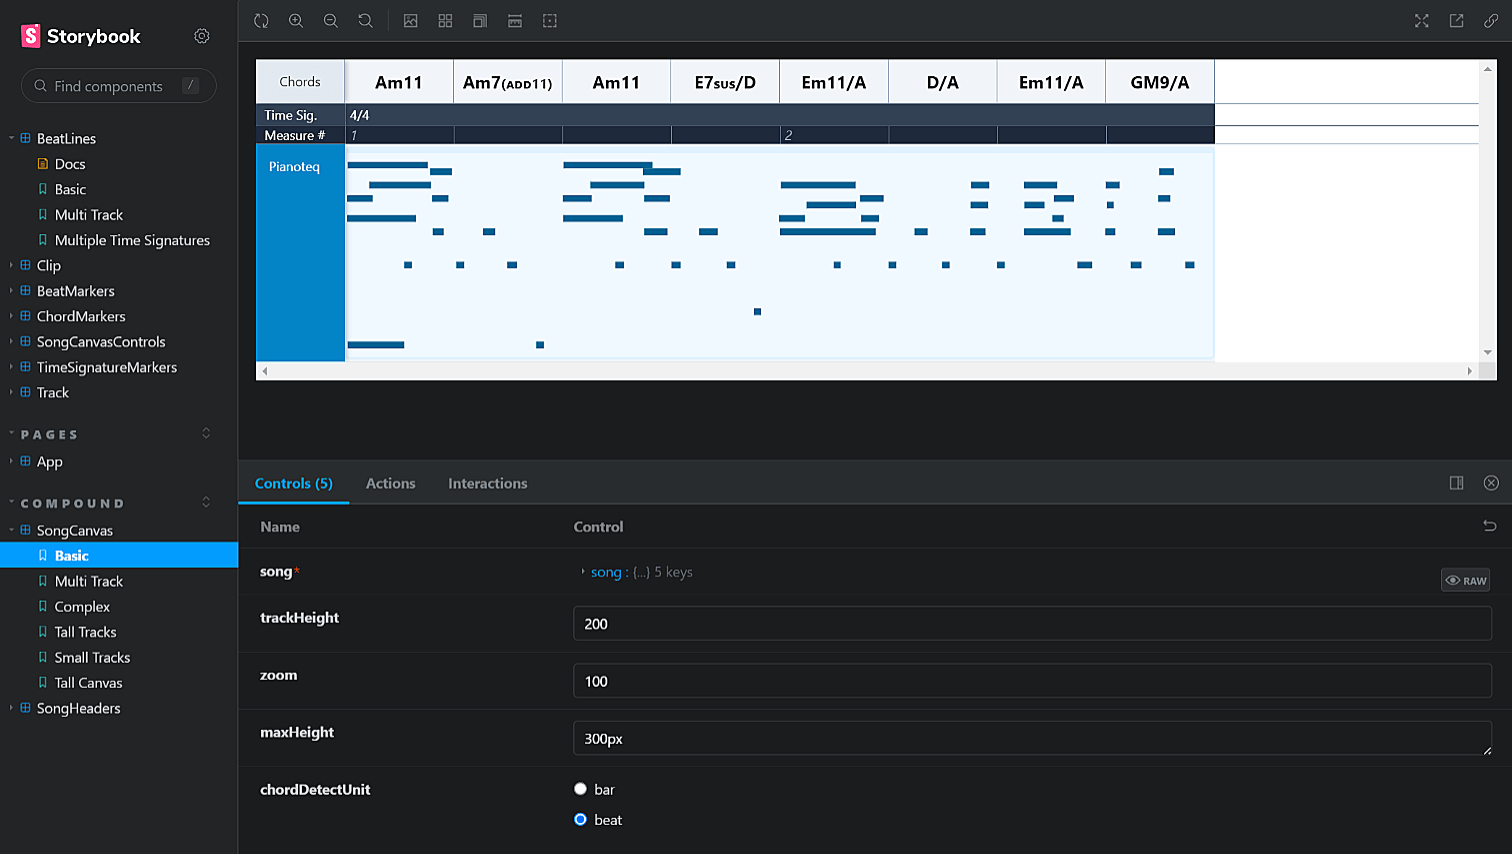
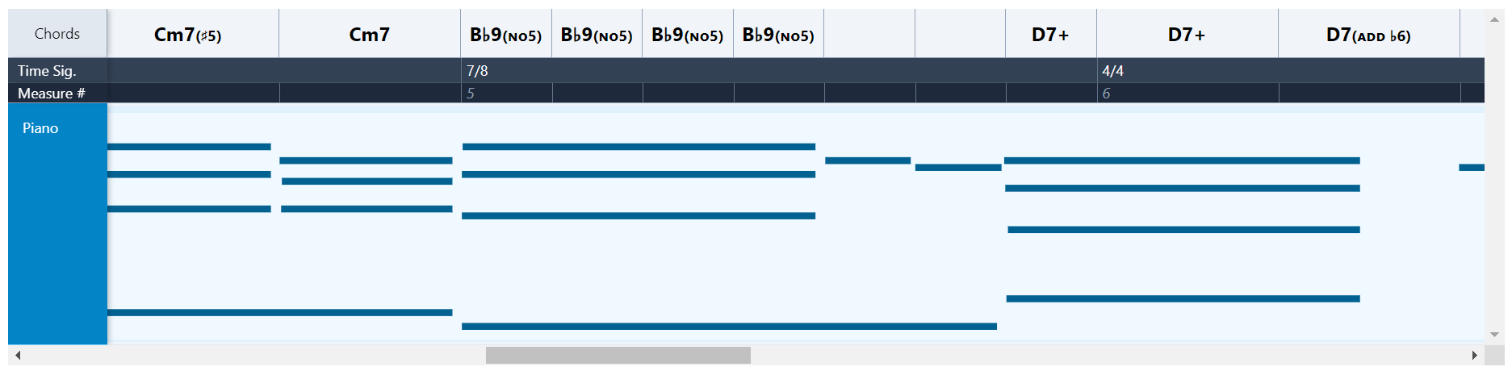
In the end, this CDD process allowed me to render multiple time signatures on the same timeline correctly. Notice how 5/4, 3/4, and 7/8 all have different lengths (even different beat lengths in some cases).

And thanks to CDD, it was trivial to feed the right notes into chord detection and stack chords on top of the timeline. When put together with Tracks and Clips—again, a task CDD is optimized for—I can now see the chords for specific notes in a song! Mission accomplished!
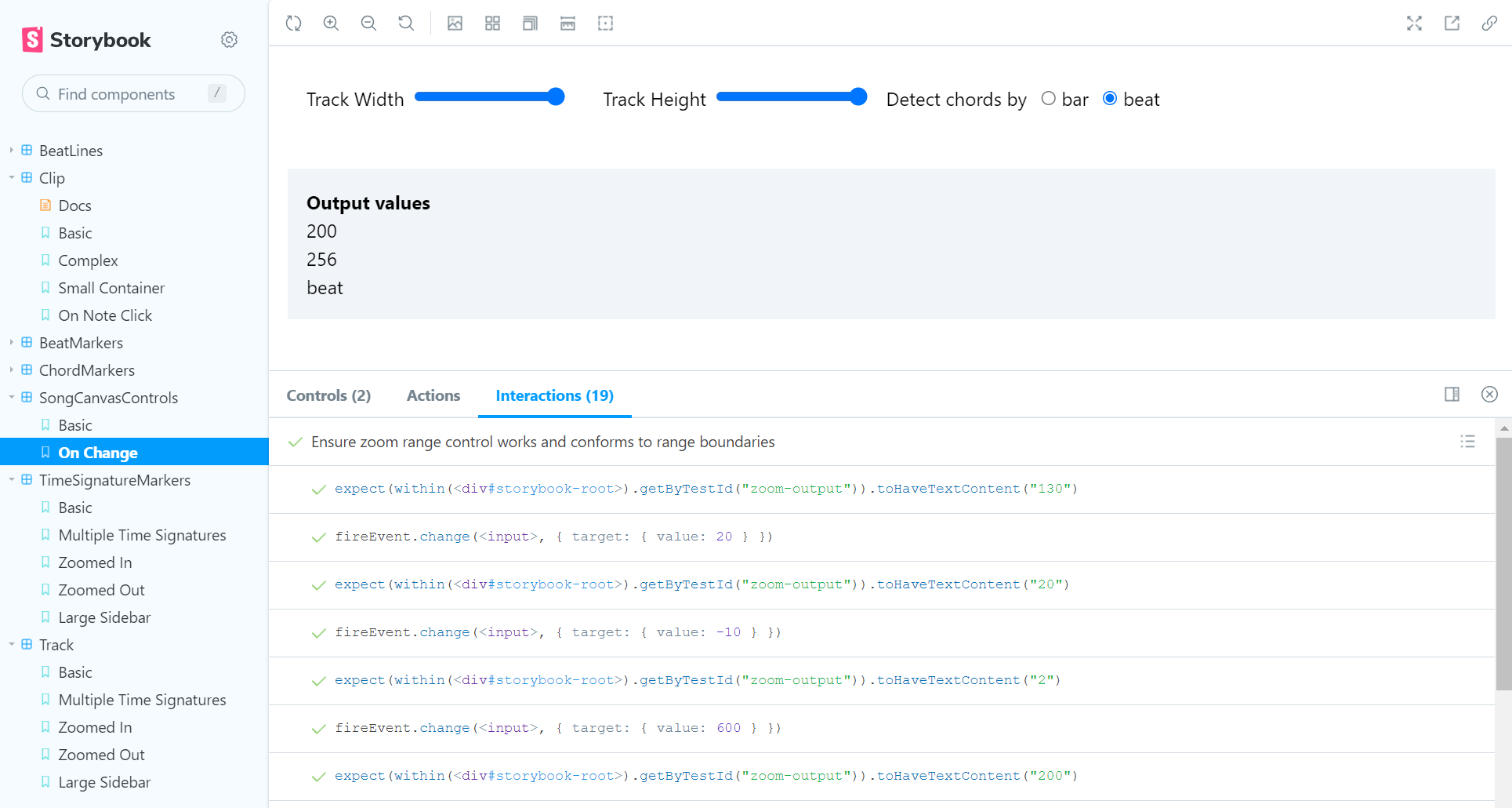
Most of the components I built required no interaction, but a few did. I created a single component for controlling the track height and width along with the chord detection method (‘bar’ vs. ‘beat’). These controls were easy to test in Storybook 7.0 which incorporates Jest and Playwright under the hood.
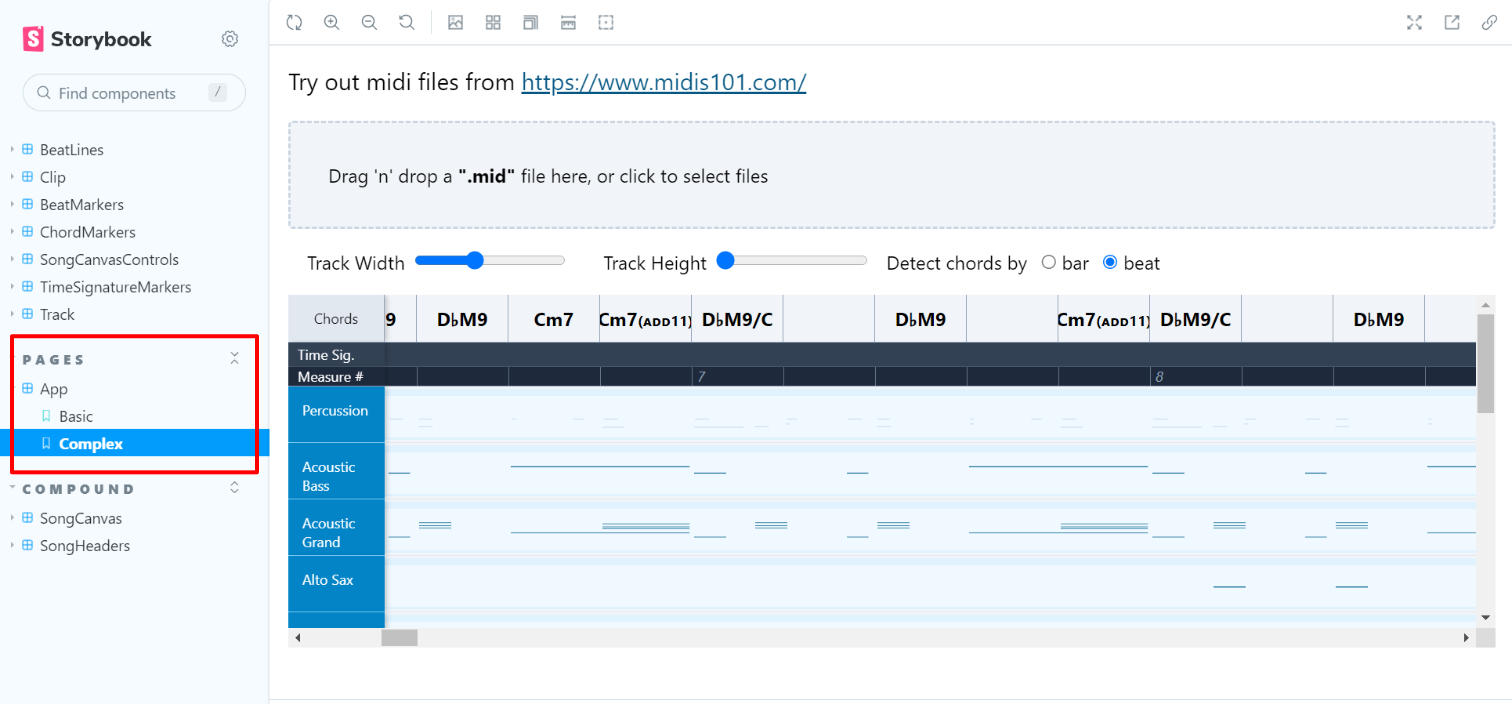
CDD suggests you can not only build independent components but you can also combine them into compound components and even entire pages.
“UIs are built from the ‘bottom up’ starting with basic components then progressively combined to assemble screens…”
I thought I would test the limits here. Below is a screenshot of a story for the entire app… the entire app! 🤯
CDD is legit. The upsides are many and not only was UI composition a breeze, I came out with better unit tests for non-component code as well. The only caution I would give is to not use CDD as a design process for anything but component libraries. CDD is not a design methodology that makes sense for most design challenges. To the engineers out there, however, use CDD in all your builds! You won’t regret it.
Check it out the completed app + source code at https://findthechord.netlify.app/!
Interested in working with me? Ping me on LinkedIn!